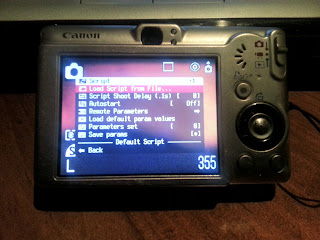
After placing the CHDK software on my IXY Digital 70, I quickly realized that the software didn't remain active after a power down. No big deal, but for the launch it needs to be active at power on.
Simply followed the Make SD Card Bootable steps and it seems to have done the trick.
Installed one of the Intervalometer scripts and have been playing around with it and some other settings.
I am looking for a script that will allow the camera to take photo's continuously at a set interval and so far this script seems to do that. I just need to tweak it so the camera runs at its lowest power consumption. Which means I need to work out how I can shoot with the LCD off.
Also need to get myself a larger SD card for the camera. I tried an 8 GB card and the camera didn't recognize it, so I'm hoping its just the type of card and not a size thing. The current card I have is only 1 Gig and with my current tests I max the card out before the battery runs flat. When I set the quality to minimum I seem to get about 1.5 hours of battery life. I'd assume that using high res shot would take a little more out of the battery then a lower res, but either way I will have to look at a battery expansion.
Will have to open the camera up and attach an external battery pack
Discovering the world of High Altitude Ballooning and success/failures with my first attempt.
Showing posts with label digital camera. Show all posts
Showing posts with label digital camera. Show all posts
Friday, October 26, 2012
Camera Trials 2
Labels:
altitude,
amateur radio,
APRS,
balloon,
CHDK,
digital camera,
IXY Digital 70
Wednesday, October 17, 2012
Camera Trials - Installing CHDK on IXY Digital 70CHDK Menu
Been really eager to get into some testing and recently received an E-Bay purchase of a Canon IXY Digital 70 camera. So now that I have it I plan to mod it with the CHDK tool and see what its capable of. Camera was really cheap but will be a great initial est unit. It may make the flight if the tests are good.
Here are the steps I am taking to get the CHDK tool working on the camera. May come in handy for other experimenters.
1. I followed the FAQ on the CHDK site, which gets you to create an empty ver.req or vers.req on the cameras SD card. With the SD card inserted I just hold the Func and Disp buttons and the version is displayed. Though I did do this first I then also found another tool that does all the work for you.
Found a tool called ACID on the FAQ page which just with a simple photo it will tell you what you need to run CHDK. This is what I ended up doing.
After running ACID I simply took a photo with the camera and dragged it into the App and got the below results.
Ticked the download stable CHDK full build and clicked the Download stable CHDK. The app then downloads and extracts into a Stable CHDK folder into the apps working directory.
2. Next I read the Preparing SD Card FAQ which gives more detail and a few other methods, but really all I did was copy the files downloaded to the SD card, in playback mode , choose firmware upgrade from the camera's playback menu. It then asks for confirmation to upgrade and it was that easy.
Following the upgrade I was able to press the printer button and the CHDK menu appears
First steps complete. Now to have a play around and check out some scripts to see what this puppy can do :-)
Edit :- Since doing some testing I have realized that you need to make the SD card bootable so that the CHDK tool will be available when you first turn the camera on.
Here are the steps I am taking to get the CHDK tool working on the camera. May come in handy for other experimenters.
1. I followed the FAQ on the CHDK site, which gets you to create an empty ver.req or vers.req on the cameras SD card. With the SD card inserted I just hold the Func and Disp buttons and the version is displayed. Though I did do this first I then also found another tool that does all the work for you.
Found a tool called ACID on the FAQ page which just with a simple photo it will tell you what you need to run CHDK. This is what I ended up doing.
After running ACID I simply took a photo with the camera and dragged it into the App and got the below results.
 |
| My results running ACID |
2. Next I read the Preparing SD Card FAQ which gives more detail and a few other methods, but really all I did was copy the files downloaded to the SD card, in playback mode , choose firmware upgrade from the camera's playback menu. It then asks for confirmation to upgrade and it was that easy.
Following the upgrade I was able to press the printer button and the CHDK menu appears
 |
| CHDK Menu |
Edit :- Since doing some testing I have realized that you need to make the SD card bootable so that the CHDK tool will be available when you first turn the camera on.
Labels:
balloon,
camera hacks,
canon,
CHDK,
digital camera,
HAB,
high altitude balloon,
IXY Digital 70
Subscribe to:
Posts (Atom)